


FULL TOUR
Step aboard the SS Jeremiah O'Brien, where the echoes of WWII still resonate.
The Full Tour starts Pierside and guides you to 63 pertinent stations of interest aboard the vessel.
Guidance
Follow the directions in the green speech bubble to be guided to each station.
Listen
Press the "Play" button to hear audio for each station.
Learn
Press the "Learn More" arrow to go to the station's page for more information.
Location
Press the "Pin Drop" to learn about a station's location aboard the ship.
INSTRUCTIONS
TO START YOUR TOUR
Make your way down the pier, and you’ll be introduced to the O’Brien’s rich and storied history.

Proceed down the pier to learn about the pivotal role played by Liberty Ships in the Allied victory of WWII.
02
HISTORY | PIER SIDE
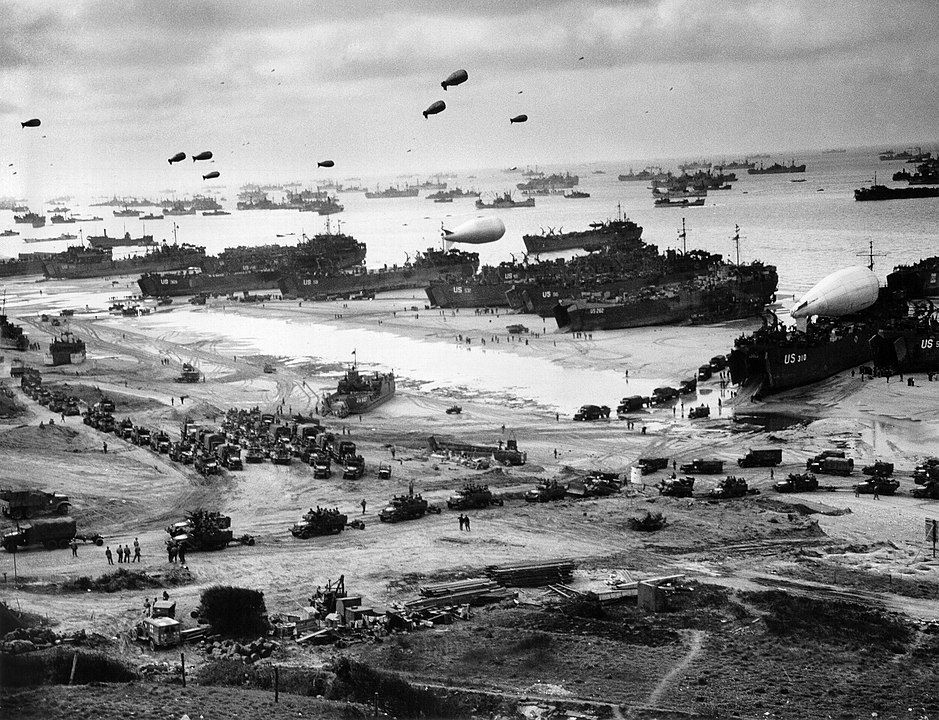
A Vital Role
Liberty Ships and their civilian crews played a vital role in the Allied victory in World War II. America’s armies fighting overseas, as well as her allies, were reliant on a steady stream of supplies and equipment, and a large number of ships were required to deliver them.
Continue walking along the pier to learn about the men who sailed the SS Jeremiah O'Brien.
03
HISTORY | PIER SIDE
Ship's Complement
A Liberty Ship’s complement consisted of two separate crews that worked together. The civilian officers and men of the US Merchant Marine were responsible for operating the ship and the Naval Armed Guard was responsible for operating the guns in defense of the ship. A wartime crew consisted of 43-48 volunteer merchant seamen and 12-28 US Navy Armed Guard signalmen and gunner’s mates.

Discover the tremendous amount and types of cargo carried across the oceans to support Allied troops and nations.

Next, we'll outline the wartime voyages of the SS Jeremiah O'Brien.

Continue toward the gangway to learn how the SS Jeremiah O'Brien was rescued from the "mothball" fleet at Suisun Bay.

The SS Jeremiah O'Brien continued making history during her epic return fifty years later to the beaches of Normandy!
07
HISTORY | PIER SIDE
An Epic Return: D-Day 50th Anniversary
In the Spring of 1994, in what was an epic eighth voyage, the SS Jeremiah O'Brien returned to England and France to commemorate the 50th anniversary of Operation Overlord’s D-Day — the Allied invasion that turned the tide of World War II in Europe.

Continue down the pier and go up the gangway to board the ship. At the top, immediately turn right and proceed forward where we’ll introduce you to an overview of the Main Deck.

The first station on the Main Deck is No. 3 Cargo Hatch, which is to your left. It is one of five that you will encounter. Note the Museum entrance, which we will direct you to later.

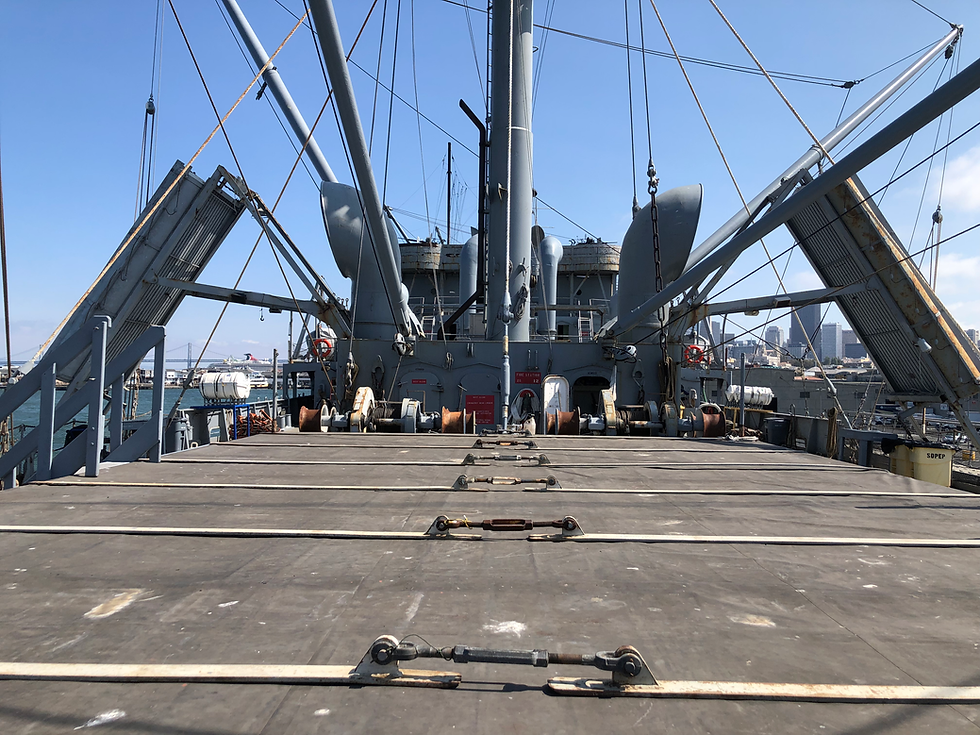
Immediately forward of No. 3 Cargo Hatch are a standard set of winches for assisting in the loading and unloading of cargo.
10
MAIN DECK | FWD
Steam Cargo Winch
Steam winches were operated in sets of two to control the cabling system and positioning of the booms. It takes two crewmembers to operate a set along with a Bosun who coordinates their movements. You will see a set of winches located beneath each mast and boom as you explore the deck.

Proceed forward to observe the Main Mast and Cargo Booms, along with the block and tackle that makes up the cargo transferring system.
11
MAIN DECK | FWD
Main Mast & Cargo Booms
The principal function of a mast on a Liberty Ship is to support cargo booms for lifting cargo from the pier onto the ship and into its holds. They also support signal lights, wireless antennae, and the crow’s nest for lookouts. The three masts on Liberty Ships are the fore, main, and mizzen.

As you continue forward, observe the angled structure above you. It’s a Life Raft, which is one of four on the ship.
12
MAIN DECK | FWD
Life Rafts
The O’Brien was equipped with four large life rafts as well as smaller ones that were scattered around the vessel's main decks. They could be quickly released or float free on their own if the ship sank out from under them and were designed to be reversible so they could be used either side up.

As you continue toward the bow, notice No. 2 Cargo Hatch on the left. It is the opening for the largest hold on the ship.
13
MAIN DECK | FWD
No. 2 Cargo Hatch
No. 2 Cargo hatch is the largest of all the ship’s hatch openings. Its corresponding ‘tween and lower holds below are also the largest on the ship. Designed to transport up to 10,000 tons of cargo and matériel to keep the theaters of war equipped and our allies supplied, a Liberty Ship’s cargo included everything from bombs to beans, toilet paper and toothpicks, jeeps, tanks, trucks, and troops.

Continue forward. On the right is one of the ship’s eight Gun Tubs. It sits atop a large, armored structure which housed ammunition for the gun above.
14
MAIN DECK | FWD
20mm Anti-Aircraft Cannons
The O’Brien was armed with eight 20MM Oerlikon antiaircraft cannons; two forward on the main deck, two on the Aft 5” Gun Platform, and four surrounding the flying bridge, at each corner of the top of the house. These cannons were primarily used for defense.

The tub and its gun is duplicated on the Port side. Immediately beneath the tub, is an armored storage area which also housed the experimental Mark 29 Anti-torpedo gear.

To the left is the No. 1 Cargo Hatch, the most forward one on the ship.
16
MAIN DECK | FWD
No. 1 Cargo Hatch
No. 1 Cargo Hatch was the opening for the forwardmost hold aboard the ship. It was highly vulnerable in high seas to taking on water breaking over the bow. The breakwater on the main deck immediately forward of No. 1 Cargo Hatch aided in diverting water away from the hold.

Proceed forward to the Bow of the ship to explore more of the O’Brien’s operational equipment.

Beneath the gun platform is the anchor chain and windlass.

The 3” gun platform above can be accessed by carefully climbing the vertical ladders on either side. Climb the ladders if you are capable.
19
MAIN DECK | FWD | @ BOW
Forward 3" Gun Platform
The primary armament of the SS Jeremiah O’Brien during the Second World War was two, 3-inch 50 caliber Naval guns mounted on the bow and stern gun platforms. These guns were intended for defense against aircraft, ships, and surfaced submarines and had a range of approximately ten miles.

Descend the gun platform. The O’Brien’s pin-up gal, Miss Jerri O’Brien, is painted on either side of the gun platform’s walls and can be viewed by looking up from the bow.
20
MAIN DECK | FWD | @ BOW
Miss Jerri O'Brien
During Operation Overlord a member of the SS Jeremiah O’Brien’s crew painted a pinup girl against a shamrock to represent the Irish heritage of the Jeremiah O’Brien. She is endearingly known as “Miss Jerri.” Much like airplane nose art that was commonly painted on the front of airplanes, she was painted on the forward gun tub, port side.

Proceed along the port side to the Foremast. Look up to see the Crow’s Nest atop the Foremast and view the painting of Bruce D. Raven.
21
MAIN DECK | FWD | @ BOW
Foremast & Crow's Nest
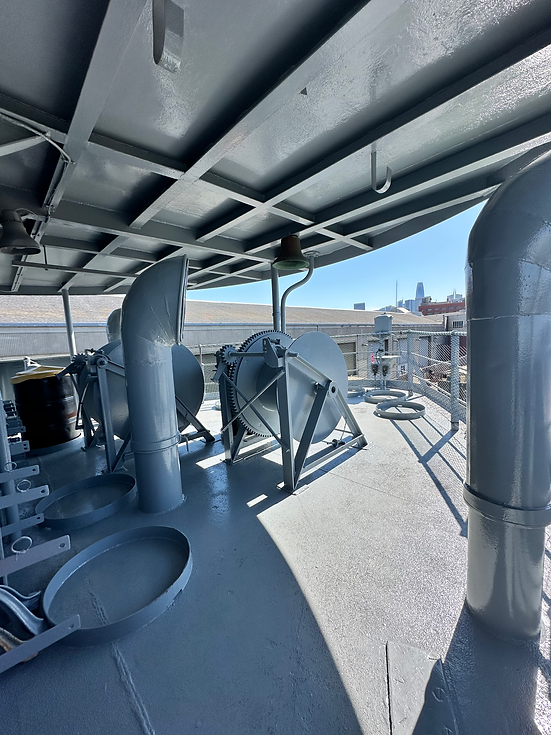
The mast closest to the bow is called the Foremast. Atop the foremast is the ‘crow’s nest,’ where lookouts would be stationed and somewhat sheltered from the weather. The jumbo boom is secured aft of the foremast. The circular bands at the top are used to secure the cargo booms in a vertical position when the ship is underway.

Continue along the port side along the passageway, past the midship house to the aft deck. Beyond the house are No. 4 and No. 5 Cargo Hatches.
22
MAIN DECK | AFT
No. 4 Cargo Hatch & Hold
Like the other hatches on the main deck, the No. 4 Cargo Hatch would have been fully loaded while at sea. During Operation Overlord’s Normandy landings, the O’Brien also shuttled troops who were quartered in No. 4 hold ‘tween deck on cots while the rest stayed on the main deck.
Continue along the aft deck toward the stern. Between Nos. 4 and 5 hatches and holds is the Mizzenmast.

Just aft of the Mizzenmast is the last of the ship’s cargo holds, No. 5 Cargo Hatch and Hold.

Beyond No. 5 Hold is the Aft House, 5” gun platform and stern of the ship. Proceed to the Aft House and use the port side entrance to explore inside.

Below the Aft house is the ship’s Steering Engine Room, which is a restricted station.
26
MAIN DECK | AFT
Steering Engine [restricted]
The ship’s Steering Engine is located one deck below the Aft house. The rudder, which is about twenty feet tall, is too massive to be moved by any simple mechanical connection to the wheel on the bridge, so the ship uses “power steering” instead.

Above the Aft house is the 5” gun platform. It can be accessed by carefully climbing the vertical ladders on either side. Climb the ladders if you are capable.

Descend the gun platform to explore the essential equipment at the stern.
Next, we’ll explore inside the Midship House. Continue forward along the aft deck and pause view the house from the outside. To enter the house, continue forward along the exterior passageway and use the entry hatch, or door, at the top of the gangway.
29
MAIN DECK | AMIDSHIPS
Midship House Overview
You are now amidship which incorporates the superstructure known as the Midship House. It contained the living quarters for the crew and officers as well as other operational facilities. It also provided the main access to the Engine Room. The house consists of four decks, each of which has a specific purpose.

On your immediate left is one of the ship's many heads and showers. This head, or restroom, is fully functional for your use.
30
MAIN DECK | AMIDSHIPS
Heads & Showers
The ship is equipped with multiple toilets called ‘heads’ along with showers for the officers and crew. All are functional and the heads can be used as needed by visitors today. The Master enjoyed a head and shower within his quarters, whereas the other officers and crew had access to shared heads.

Turn right to start exploring several of the many Crew Quarters on this deck. Notice within the House, above each door sill, is a plaque designating the cabin's use or its occupants.
31
MAIN DECK | AMIDSHIPS
Crew Quarters
The crew of a Liberty Ship lived in these cabins known as fo'c'sles (pronounced FOHK-səl) which were named after the spaces in the bow of a ship where prior generations of seamen were quartered. The fo'c'sles housed a maximum of four men and included modest luxuries such as lockers, bunk lights for reading, and porthole fans for ventilation.

Turn left into the Officer's Salon. Feel free to take a seat and experience what it was like to sit at an officer’s table.
32
MAIN DECK | AMIDSHIPS
Officers' Salon
The Officer’s Salon is where the ship’s officers ate their meals and relaxed while off duty. This salon was better appointed and offered more comfort than the crew’s eating area as it featured cushioned settees and armrests on the wooden chairs with adjustable fiddle boards that kept plates from sliding off the tables in heavy seas.

Exit the Officer’s Salon through the port side passageway. On the immediate right are additional crew quarters. Turn left and continue down the passageway to see the Crew Messes on your right.


Turn left into the transverse passageway opposite the Crew Mess, and take the ladder up to the Boat Deck. At the top of the ladder we will introduce you to the Officer's Quarters.

Turn left toward the exterior door. On your left is the Purser's Cabin.

Proceed outside and we’ll introduce you to the Boat Deck. Once on the deck, turn around to face the house.

Turn toward the #3 Lifeboat, port side on your left and face forward.

Walk forward alongside the Lifeboats on the exterior port side deck. Pause forward of the two Lifeboats to view the Lyle Gun.

Turn right to re-enter the house through the wooden door on your right to explore the Officer’s Quarters. The first cabin on your left is the Chief Engineer's.


Turn right down the passageway. On your left, between the Third Mate’s Cabin and the Second Mate's Cabin is the Hospital.

Your next stop is the Bridge Deck. Take the ladder up and pause at the top where we’ll provide you an overview.
43
BRIDGE DECK | AMIDSHIPS
Bridge Deck Overview
The Bridge Deck was the command center of the ship. It contained the Wheelhouse where the primary steering and transmitting of orders to the engine room took place, the Chart Room where navigational courses were plotted, and the Radio Room from where the ship’s primary communication for ship-to-ship or ship-to-shore was done.

Now that you’re on the Bridge Deck, the first cabin in front of you on your left is the Radio Officer’s.
44
BRIDGE DECK | AMIDSHIPS
Cadets’ Quarters
Cadets were students from one of several maritime academies who were in training to become deck, engineering, or radio officers. Part of their curriculum was a six-month period of practical training at sea, which meant sailing on an active merchant vessel, even during wartime.

Immediately adjacent to the Radio Officer’s Cabin are the Cadets’ Quarters.


Continue down the hall on your right. Turn right again bypassing the Bridge Deck and Chart Room. We will bring you back here after visiting the Master’s Stateroom which is at the end of the hall on your left.
Turn around and return to view the Chart Room which will be on your right.


Next, we’ll take you to the Top of the House to admire the views and see from where the ship can also be steered. Exit the Wheelhouse from the starboard side door. Turn right and take the ladder up.

Observe the Flying Bridge platform which features the ship's secondary steering equipment.

Next, we’ll take you to the Engine Room. Use any aft ladder and make your way down to the Main Deck. Re-enter the Midship House from either the port or starboard hatch. Immediately turn left or right into the rear passageway where we'll introduce you to the Engine Room as you step into the entry platform.

From the Engine Room Entry platform, take the ladder down one level to the top of the cylinder heads to learn how the Engine Room operates.

Remain on this level to explore the top of the Triple Expansion Steam Engine.
55
ENGINE ROOM | LEVEL 1
Steam Engine: Cylinder Head
You are standing next to the cylinder heads of the ship’s main engine; a three-cylinder, triple-expansion, double-acting steam engine designed before the turn of the 19th century by Scottish and English engineers. It is driven by steam generated in the two boilers.

Take the ladder down to visit level two and observe the pistons and rods beneath the cylinder heads.
56
ENGINE ROOM | LEVEL 2
Steam Engine: Pistons & Rods
The engine is directly coupled to the propeller by the crankshaft. As a three-cylinder, triple-expansion, double-acting steam engine, double-acting means that steam pushes the piston both down and up. Therefore, every motion produces a force on the crankshaft and thus the propeller.

Observe the electrical plant which that is opposite the pistons and rods.

Take the ladder down to visit level 3. Continue viewing the steam engine on your left to see the reversing engine and crankshaft. If no crew are present, this area will be roped off and inaccessible.
58
ENGINE ROOM | LEVEL 3
Steam Engine: Reversing Engine & Crank Shaft
How do you reverse the engine, or go ‘astern,’ on a Liberty Ship, as there is no transmission to shift gears? Since the crankshaft is connected directly to the propeller shaft, the only way to go astern is to reverse the rotation of the crankshaft by reversing the main engine.
Step forward into the fire room to view the ship’s boilers. Our friendly engineers on duty can usually be found at this level. Feel free to ask them any questions you may have about the Engine Room.

Next, you can visit the No. 1 and No. 2 Cargo Holds that feature the ship’s Museum. Take the ladders back up to the Engine Room Entrance. As you exit, turn left, then left again to proceed down the long hallway until you reach the first exit on your right. Step onto the main deck and turn left. Proceed forward to the sign pointing to the Museum entrance. Take the ladder down. At the bottom of the ladder to your left, you can peer into No. 3 Cargo Hold, which is restricted to crew only.

You are now on Tween Deck in No. 2 Cargo Hold and Museum. Walk to the raised acrylic-covered ‘trimming hatch’ opposite the bottom of the ladder to view the depth of lower No. 2 Cargo Hold. Explore the WWII artifacts featured along the perimeter walls.

Proceed to No. 1 Cargo Hold through the port side or left entrance where the Museum displays important WWII dioramas, models, and military vehicles.

To visit our World War Two "Slop Chest" display, pass through the double doors opposite the Normandy diorama. This station is featured within our modern-day Ship Store. If the Ship store is closed, this concludes your tour. To return to the Main Deck, exit from the door you entered back into No. 2 Hold and up the ladder you descended from.
63
'TWEEN DECK
'Slop Chest' or Ship Store
Welcome to our Ship Store where you can purchase exclusive O’Brien merchandise and souvenirs to remind you of your visit today. All purchases directly support the ongoing maintenance of the SS Jeremiah O’Brien. During WWII, there was a store available to the crew known as the “Slop Chest.” Various items were available for purchase including toiletries, clothing, candy, and other items a crew member might need that were not already provided to them and subtracted from their pay at the end of the voyage.

This concludes our self-guided audio tour. To return to the Main Deck, exit the Ship Store through the door into No. 2 Hold and back up the ladder you descended from. Thank you for your visit today!